How to Create a Portal Page - Not Bootstrap Design
To create a new portal page, go to Portal > Administer Portal Pages in the administrative menu.
Click New in the toolbar.
The Portal Page detail tab will open up.
- Default
- This is a generic page.
- Dashboard
- This page can be configured with any widgets that would be useful for you to easily access. Any dashboard that you create will appear on your My Dashboard page (Portals > My Dashboard)
- Home Page
- Each user can only view one Home Page, so if your organization has more than one active home page, be sure that there is no overlap between home page audiences.
- Social Group page
- This portal page is part of the Social functionality. A social group page must exist in your system before users can create groups. One social group page will be the designated template. If a group owner wants a widget on their group page that is not part of the template, you will need to create an additional social group page and then associate the new Social Group page with the existing group on the Manage Groups page.The template (default) version of this page will set the widget options for social groups that can be created by your end-users.
- Development History
- This page should be used to display the user's Development History.
- Development Plan
- This page should be used to display the user's Development Plan.
- Display Resource
- This page should be used to display the resource description etc. This is the page that displays once a resource has been selected from the course catalog or Development Plan.
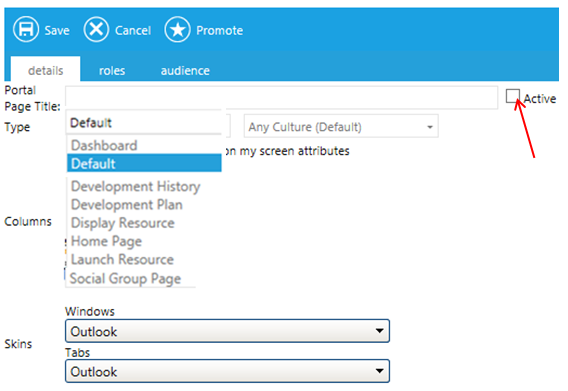
- Portal Page Title
- Enter a Portal Page Title. This title will not be visible to the end-user. The title will only be visible on the Administer Portal Pages overview screen.
- Active checkbox
- By default, all new portal pages are inactive. Once your portal page is complete, you will need to select the Active checkbox so that it is visible to the selected audience.
- Type
- Select the Type of page that you are creating (based on your system's configuration, all of these types of pages may not be available):
- Standard Custom Pages Type
- The pages listed below are standard LMS pages. These page types are preset and can only be edited by LearnShare.
- Default Page for this type?
- This checkbox will only be visible when the selected page type can be used as a template. Check this box if your portal page should be used as the template for this type of page. For example, end-users are allowed to create their own Social Group pages. When creating a new group, the group owner is allowed to select which widgets should appear on the group page. However, the owner has a limited number of widgets from which they can select. The widgets that are added to the Default Social Group page will be the list of available widgets from which a group owner can select when creating their own group page.
- Mobile Only
- Check this box if the Portal page should only be available on the mobile version of your LMS. If this box is left unchecked the Portal page will only be available on the desktop version of your LMS. Currently a portal page cannot be created for both the mobile and desktop versions of the LMS. A page must be created for one or the other.
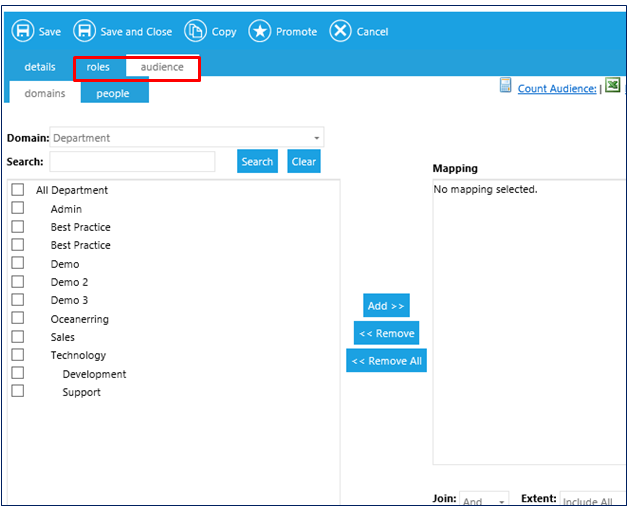
Roles and Audience Tabs
The audience of a portal page can be mapped by role or by domain or both. If there is mapping on both the Role tab and the Audiences tab, then the portal will only be visible to employees who have the selected role and are in the selected audience.
For example, if you want to create a page that is only visible to Managers, then select the Manager role on the roles tab, and leave the audience tab blank. However, if the page should only be visible to Managers in the Sales Dept, then select the Manager role on the Roles tab and map to the Sales Dept on the Domains sub-tab of the Audience tab.
If no audience mapping is defined on the portal page, then everyone will be able to view the portal page.
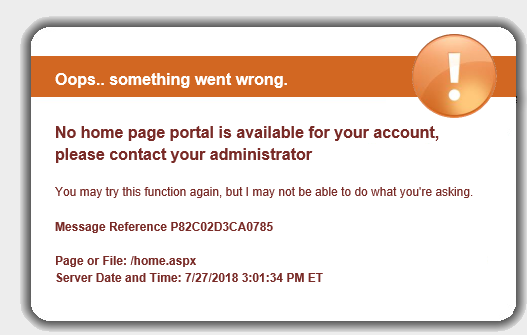
Important Note about Homepages: When applying audience mapping to Home Pages it is important to ensure that there is no overlap between the defined audiences. If an employee is a member of more than one Home page audience, there is no way to determine which Home page the employee will see.
It is also imperative that all users are in a Homepage audience. If a user tries to log into the LMS and they are not a member of an active Homepage audience, they will receive the following error message.
Once the audience has been set, click Save.
Details Tab
Once you have selected your page type, you will need to design the layout of your page.
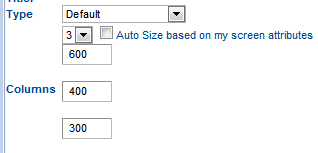
Select the number of columns your page should contain; options are 1, 2, or 3.
Select the Column Width. A fixed column width can be selected or the LMS can automatically size the columns based on the screen attributes. In the screen shot above, the “600” defines the first column, “400” the second, and “300” the third.
Select the Auto Size checkbox if you wish the columns to be re-sized automatically to fit the end-user's browser. This is the recommended option.
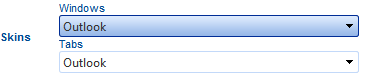
Under Skins you can select the appearance the framing elements (Windows) and navigation tabs (Tabs). On each portal, you will also have the option to hide these elements, making the skins invisible.
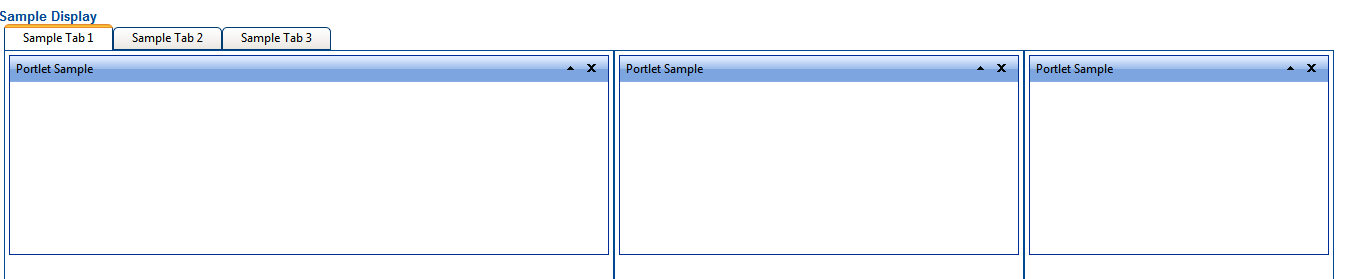
The Sample Display at the bottom of the Details tab allows you to view your selected column width and skins as you select them.
Save
Once the parameters of the portal page have been defined, click Save. You are now ready to begin adding the individual widgets to the portal page.